

A clean deck can still be damaged by an overly forceful wash. To understand how to maintain a timber deck, sweep it weekly, clear away leaves and debris, and rinse off detergent thoroughly after cleaning. If you use a pressure washer, keep it on a low setting and hold the nozzle 15 to 30 cm from the boards. Let the timber dry completely before moving furniture back onto it.
Regular care helps prevent dirt and moisture from lingering on the boards, but the finish matters too. Australian decks are exposed to strong UV, heavy rain and, in coastal areas, salty air. Consider how each treatment protects the timber and affects its appearance. This guide covers cleaning and preparing the boards, choosing between oil and stain, and applying decking oil. It also compares water-based and non-water-based oils, including differences in durability and their effect on the timber’s natural colour.
Key Takeaways
- Move furniture and other belongings before cleaning, then clear debris from the boards so trapped dirt and moisture don’t linger.
- Use a pressure washer on a low setting and keep the nozzle 15 to 30 cm from the timber to reduce the risk of surface damage.
- Choose a finish by the result you want: stain changes the timber’s colour, while oil helps protect it from UV and water damage.
- Compare water-based and non-water-based oils for their effect on durability and natural colour before deciding what suits your deck.
- Prepare the boards carefully before oiling, and plan to reapply oil-based treatments every 6-12 months.
How do I clean my Timber Deck?
To understand how to maintain a timber deck, start by clearing the surface, then clean gently and rinse thoroughly. In bushfire-prone areas, remove dry leaves and debris regularly; routine cleaning doesn’t replace property-specific bushfire requirements. Follow cleaner labels, keep people clear of spray, and use a pressure washer only on a low setting, with its nozzle 15 to 30 cm from the boards.
-
Clear furniture and objects
Move furniture, pots, mats and other belongings off the deck before you start. Check beneath them for trapped leaves, damp patches or mould, then sweep the area clear. With the deck unobstructed, you can clean the board edges and inspect the surface properly. Keep belongings off until the boards are completely dry to prevent moisture or cleaner residue transferring to furniture.
-
Choose a deck cleaning product
Choose a cleaner labelled for timber decking and follow its directions for dilution, application and rinsing. Match the product to the task: a timber deck cleaner may be suitable for general dirt, while visible mould should be treated before pressure washing. Don’t mix cleaning products or leave detergent on the boards. Rinse thoroughly, since residue left behind may fade or discolour the surface.
-
Clean and prepare the deck
Sweep first, including gaps where grit and leaves collect. Organic debris left for long periods can decompose and become acidic, potentially damaging timber. Apply the chosen cleaner as directed, then scrub remaining grime with a suitable deck brush. Treat and remove mould before pressure washing. Keep the washer on a low setting and hold the nozzle 15 to 30 cm from the boards; excessive pressure can damage the surface.
-
Clean and brighten weathered timber
On weathered boards, remove dirt and residue before using a timber brightener designed for decking. Follow the label’s application and rinsing directions, and test an inconspicuous area to see how the timber responds. Brush along the grain, not across it, to avoid roughening the surface. Let the boards dry completely before assessing their colour or bringing the furniture back.
Sweep weekly and clear autumn leaves before they trap moisture against the boards. These simple steps help maintain a timber deck between deeper cleans. Once the deck is dry, check that the surface is smooth and note any damage that needs attention before applying a finish.
Choosing water-based or oil-based finishes
Choose a finish based on the protection and appearance you want, and check that it suits the existing coating. Australian decks face intense UV, heavy rain and, near the coast, salty air.
-
Compare water-based and oil-based finishes
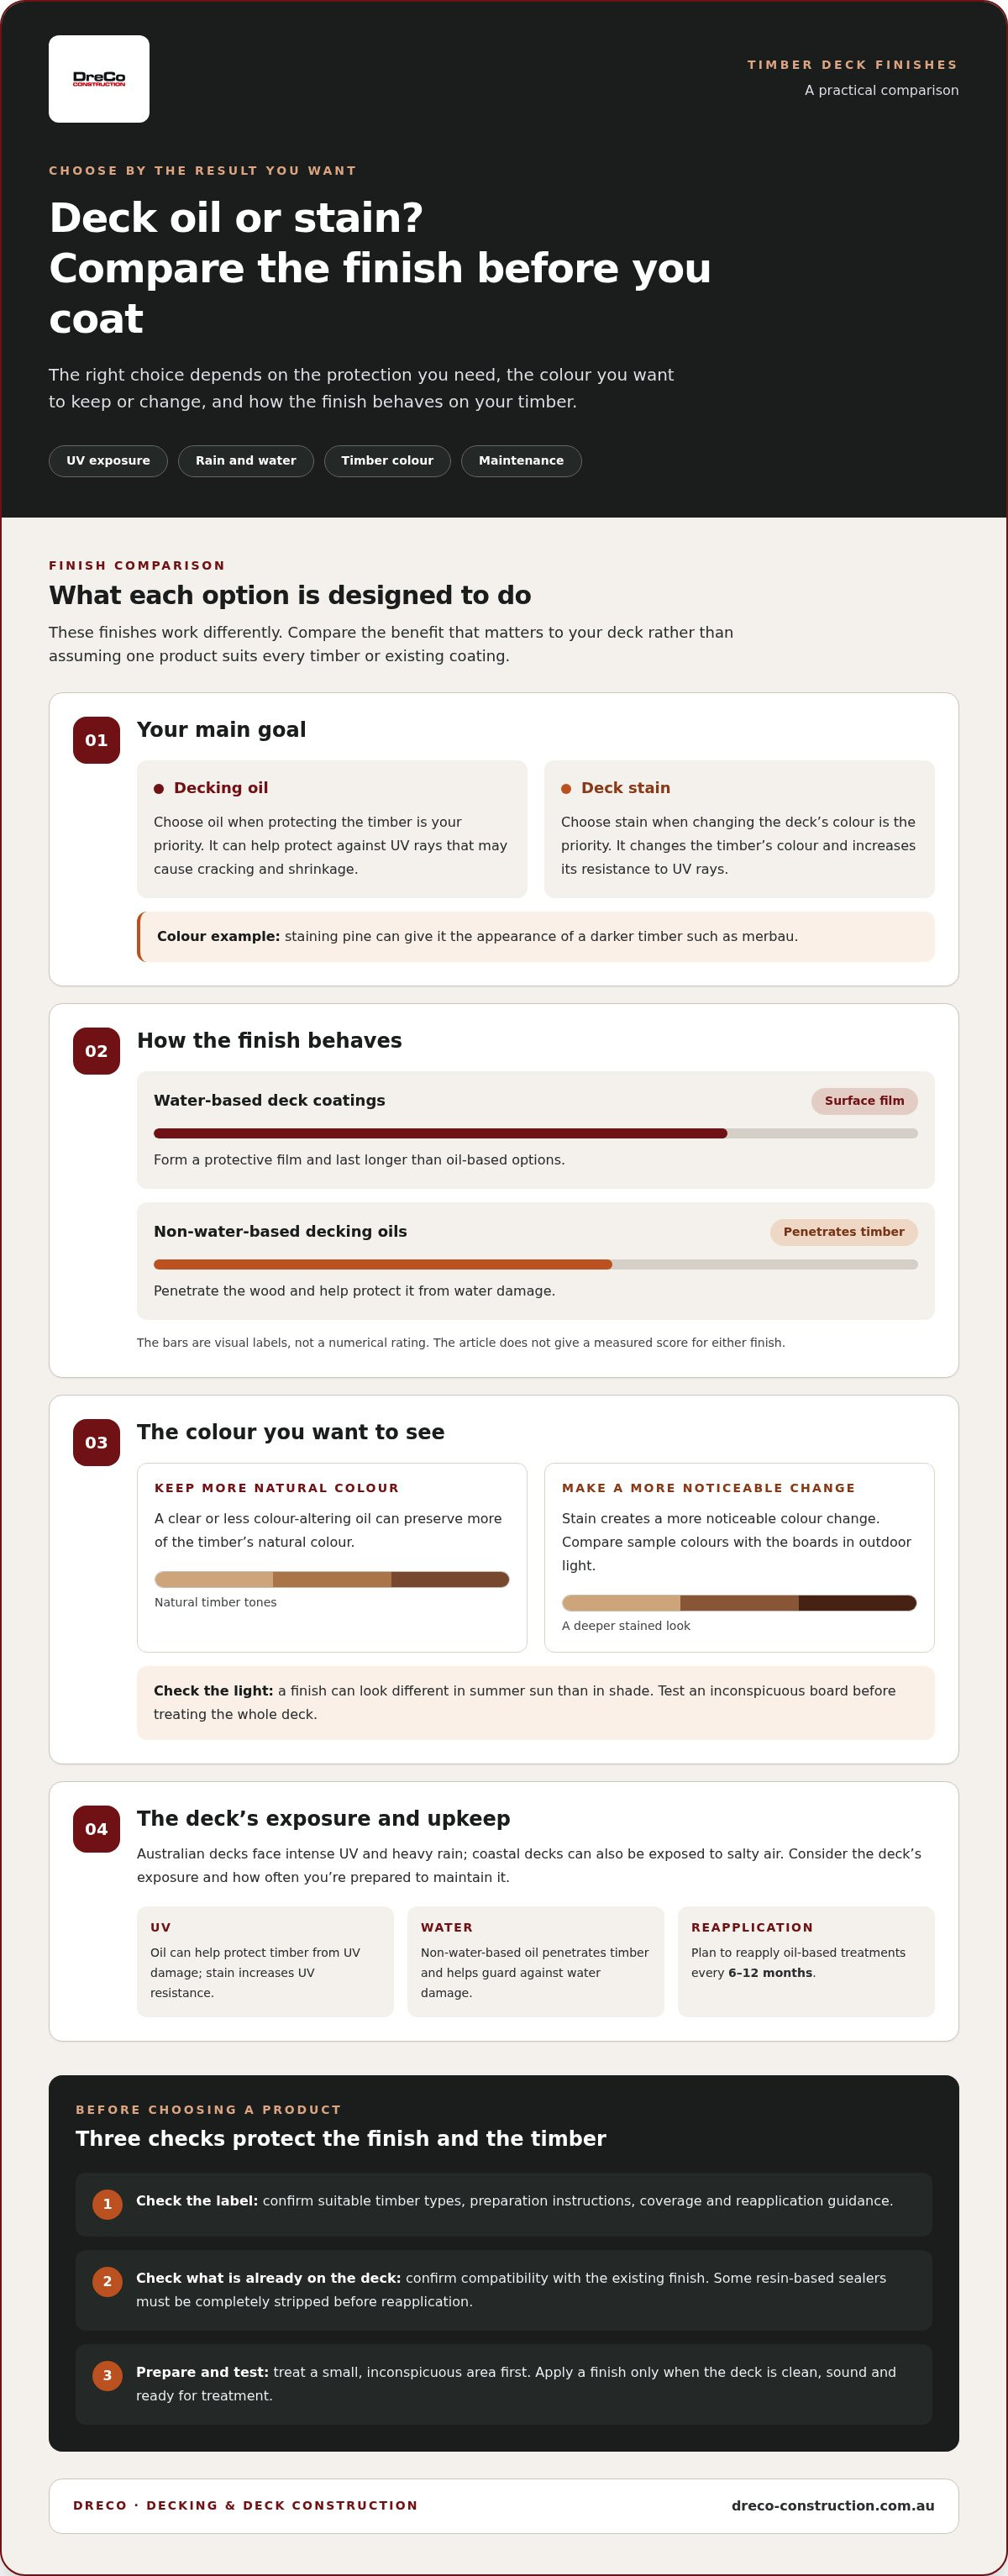
First decide whether you prefer a surface film or a finish that penetrates the timber. Water-based deck coatings form a protective film and last longer than oil-based options. Non-water-based oils penetrate the wood and help protect it from water damage. Because the finishes behave differently, consider the deck’s exposure to rain and how often you’re prepared to maintain it.
Check the product label for suitable timber types, preparation instructions and compatibility with the existing finish. A coating that doesn’t suit the deck or its previous treatment may not adhere properly. Water-based and oil-based products can also look different, so test your preferred finish on an inconspicuous board before treating the whole deck.
-
Choose between decking oil and stain
Choose decking oil if protecting the timber is your priority. Oil can help protect against UV rays that may cause timber to crack and shrink. Non-water-based decking oils also penetrate the wood and help guard against water damage. Check whether the product is water-based or non-water-based, since this affects its finish and maintenance.
Choose stain if changing the deck’s colour is your main priority. Deck stain changes the timber’s colour and increases its resistance to UV rays. For example, staining pine can give it the appearance of a darker timber such as merbau. Compare sample colours with the boards in outdoor light, as a finish can look different in summer sun than in shade.
-
Select a deck coating
Match the coating to the timber’s condition and the appearance you want to maintain. A clear or less colour-altering oil can preserve more of the timber’s natural colour, while stain creates a more noticeable change. Read the label for coverage, application directions and reapplication guidance rather than assuming all oils and stains follow the same schedule.
Before buying, identify the existing finish and check compatibility. Some resin-based sealers must be completely stripped before reapplication. If boards are damaged rather than simply weathered, a new coating won’t repair them; consider whether timber decking and re-decking better addresses the underlying condition. Choose the finish only after the deck is clean, sound and ready for treatment.
What is best: decking oil or stain?
Choose a finish based on the protection and appearance you want, then maintain the deck between applications. Sweep weekly, clear autumn leaves and inspect the fixings and structure monthly.
-
Choose suitable oils and stains
For Australian hardwood or treated pine, choose a deck oil or stain whose label specifies that timber type and the existing treatment. Suitability depends on compatibility, exposure and the colour you want, so don’t assume one product works for every deck.
Compare the product’s stated protection and finish. Decking oil can protect timber from UV rays that may cause cracking and shrinkage. Non-water-based oil penetrates the wood and helps protect it from water damage. Stain changes the timber’s colour and increases its resistance to UV rays. Test a small, inconspicuous area first to see how the finish looks on your boards.
Check the exposed end grain, including cut board ends, where water can enter the timber. Apply a compatible protective treatment to these areas, following the product directions. Keep the finish even and avoid leaving pools of product around joins or fixings.
-
Protect timber from UV rays and water
Keep up a regular cleaning and inspection routine between coating applications. Sweep timber decking weekly and remove leaves and debris promptly, especially in autumn. Organic matter left on boards can decompose and become acidic, while trapped moisture encourages mould. Clear the gaps between boards so water and debris don’t collect there.
Inspect the deck monthly for loose fixings, protruding nails, damaged boards and structural changes. Tighten loose fixings and deal with raised nails before they catch feet or furniture. Check shaded areas and exposed ends closely, as dampness or wear may be less obvious there. A moisture meter can help identify timber with moisture content that may put it at risk of rot.
Australian decks face intense UV, heavy rain and, in coastal areas, salty air. Clear debris after windy weather and pay closer attention to exposed sections. If you find rotten beams, replace them promptly or section off the affected area until the damage is addressed.
-
Apply protective treatments and refinish
Plan refinishing around the product and the deck’s condition. A general interval for refinishing is 12-24 months, while oil-based timber deck treatments require reapplication every 6-12 months. Follow the specific product instructions, since the finish type affects the schedule.
Before recoating, remove damaged or rotten boards, tighten loose fixings, hammer protruding nails below the surface and sand the timber along the grain. Resin-based sealers must be completely stripped before reapplication. Don’t cover a failing coating with a fresh layer. Prepare the surface so the new treatment can adhere properly.
Choose oil to protect the timber while retaining a more natural appearance, or stain when you want to change its colour and add UV resistance. Paint is another option, but it covers the timber grain and changes the deck’s appearance. Before applying any treatment, make sure the boards are clean, sound and dry, then follow the product label’s application and maintenance directions.
Applying decking oil
- Choose a suitable day and make sure the timber is completely dry before applying decking oil. In summer, avoid treating the deck in extreme heat, which can affect application. Check the product label for weather and application directions, and plan the work so the freshly coated boards can dry without foot traffic.
- Prepare the surface before opening the oil. Remove rotten or damaged boards, tighten loose fixings, hammer protruding nails below the surface and sand rough timber along the grain. Clear away the sanding dust so it doesn’t get trapped in the finish. A clean, sound surface helps the coating sit evenly and prevents loose material from spoiling the result.
- Read the label for the application method and any instructions about stirring. Test the decking oil on an inconspicuous board first, as timber can absorb and show colour differently across a deck. Check the test patch in natural light before proceeding. Keep a brush, clean cloth and product container close by so you can work steadily without stepping across wet boards.
- Apply the oil with a suitable decking brush, working along the grain and following the product directions. Coat a manageable area at a time and maintain a wet edge to reduce visible joins. Spread the product evenly across each board, including exposed edges where the directions allow. Avoid pools or thick patches, which can dry unevenly and leave an inconsistent finish.
- Check the surface as you work and wipe away excess oil if the label directs. Pay attention to board ends and the spaces around fixings, where product can collect. Follow the stated drying and recoating instructions rather than applying another layer too soon. Keep furniture and other belongings off the deck until the surface is completely dry.
- If you’re applying stain instead, use the same careful preparation and follow its label for application and drying. Some decking stains used with an application pad can help finish the job five times quicker than a paintbrush. That method suits the product and applicator directions, so check compatibility before starting. Oil-based timber deck treatments require reapplication every 6-12 months. Note the date and inspect the coating as it wears, then plan the next application according to its condition and product guidance.
Comparing water-based and non-water-based decking oils
Choose an oil by considering how it wears, protects the boards and affects their colour. For a lighter effect, water-based oil is often the better fit.
- Decide whether you want the oil to sit on the surface or penetrate the timber. Water-based decking oils tend to last longer because they sit on top of the wood. Non-water-based oils penetrate the boards and can provide water protection. Check the label for the product type, suitable timber and preparation steps before choosing.
- Compare the colour effect on a small, discreet section first. Water-based oils usually have less impact on the timber’s natural colour, while non-water-based oils give boards a slightly darker shade. A test patch shows how that difference looks on your timber in the light around your deck. Don’t assume the finish will look identical across every board.
- Match the finish to the deck’s exposure and the upkeep you prefer. Water-based oil may suit boards where preserving a natural appearance matters. A penetrating, non-water-based oil may suit you if you prefer a darker tone and water protection. Australian decks face strong UV, heavy rain and, near the coast, salty air, so factor in local exposure too.
- Prepare the deck according to the product directions before applying either oil. Remove furniture and pots, then clear leaves and other debris from the boards and gaps. Check that the timber is clean and dry, and look for old coatings that could affect adhesion. Keep plants clear of the work area and protect them from drips or rinse water.
- Use the label to guide application, drying and reapplication. Don’t treat water-based and non-water-based oils as interchangeable; their application directions and surface effects differ. Apply an even coat to a test area, then assess its colour and finish before continuing across the deck. If the boards are damaged or the finish keeps failing, consider whether discussing timber deck construction is a sensible next step.
DreCo: Decking & Deck Construction
DreCo can help when a deck needs more than routine cleaning and oiling. If boards are rotten, loose or too worn for another coating, DreCo’s timber decking and re-decking work can address the underlying condition. For a new outdoor area or a different material, DreCo also builds decks, including composite decking.
If the deck needs attention alongside its boundary, fencing, gates and privacy screens may also fit your outdoor plans. The right scope depends on what needs repairing, replacing or building, rather than simply adding another coat of oil.
If you’re considering a deck project, contact DreCo to discuss your plans.
Make your next deck decision with care
Think beyond the next coat. How you use your outdoor space, the condition of the boards and the look you want can all shape your next step. A steady routine is part of maintaining a timber deck, but persistent damage may call for a broader change rather than another surface treatment.
DreCo offers deck construction, composite decking, and timber decking and re-decking. These services can suit different plans, from renewing worn timber boards to creating a new deck. Consider what you want the space to do, then discuss a scope that fits your home and outdoor area.
If you’re weighing up what to do with your deck, contact DreCo for decking advice. A clear next step can help you plan a practical way forward and make better use of your outdoor space.
Frequently Asked Questions
Should you stain, oil or paint your deck?
Choose oil to help protect the timber while keeping more of its grain visible, stain to change its colour, or paint for a more opaque finish. The right option depends on the existing coating, the timber and the appearance you want. For example, staining pine can give it a darker look. Check product compatibility before changing finish types, as preparation may differ.
What to apply to your deck?
Choose a product labelled for your deck’s timber and existing finish. Oil, stain and paint create different appearances, so consider whether you want to retain the grain or change the colour. Read the label for surface preparation, application and drying directions. If there’s an old resin-based sealer, it must be completely stripped before reapplication. Don’t choose a treatment based on colour alone.
What are the steps for cleaning a timber deck safely?
First, move furniture and pots, then sweep the boards and gaps. Apply a timber-suitable cleaner as its label directs, scrub where dirt remains, and rinse detergent away thoroughly. If using a pressure washer, choose a low setting and keep the nozzle 15 to 30 cm from the surface. Keep people and belongings clear during washing, and wait until the deck is dry before putting items back.
How do you remove mould, mildew and algae from a timber deck?
Treat visible mould before pressure washing, using a cleaner labelled for timber decking. Follow its directions, including contact time and rinsing, and scrub affected boards with a deck brush. Don’t rely on water pressure alone to remove growth, as forceful washing can damage the timber. Check shaded corners and beneath pots afterwards, since persistent dampness can encourage mould to return.
How often should you oil, stain or seal an outdoor timber deck?
Use the coating’s instructions and the deck’s condition to guide reapplication. A general refinishing interval is 12-24 months, while oil-based timber deck treatments require reapplication every 6-12 months. Exposure to strong sun, rain or coastal salt air can affect how quickly a finish wears. Inspect the surface between applications, rather than waiting for the timber to look severely weathered.
How can you tell when a timber deck needs sanding or recoating?
Look for uneven colour, a worn or patchy finish, rough raised fibres and areas where the coating has lifted. Check board edges and exposed ends as well as the main walking surface. If the deck feels rough underfoot or the finish is no longer continuous, assess the timber before recoating. Sand only sound boards, and address loose fixings or damaged sections first.
How do you maintain a timber deck in harsh sun, coastal or wet Australian climates?
Clear debris promptly, keep gaps between boards open, and inspect exposed areas for finish wear and moisture damage. Coastal homes may need more frequent maintenance because of salt air. In 3186, 3187, 3188, 3189, 3190, 3191, 3192 and 3193, consider how coastal exposure affects your deck’s sheltered and exposed sides. Adjust care to the conditions each part faces.
How can you prevent deck boards from warping, splitting, rotting or becoming slippery?
Prevent leaves and dirt from trapping moisture against the boards, and clear blocked gaps so water can drain away. Inspect the deck monthly for loose fixings, damaged boards and structural issues. Remove slippery surface growth with a cleaner suitable for timber, then rinse away residue. Treating timber won’t repair rot: replace damaged boards, and replace rotten beams promptly or section off the affected area.


